Engagement Sessions in Dubsado
One of the biggest questions I get as a Dubsado Pro is how to use Dubsado as a wedding photographer to facilitate engagement sessions. This is a fair question, especially as Dubsado doesn’t give us a clear way as to how to handle these sessions when they are attached to a wedding project.
In this blog post, I’m going to teach you how I handle engagement sessions in my own wedding photography business and some tips and strategies as to how you can handle it in your own.
How to Schedule Engagement Sessions in Dubsado
1.) Create a scheduler template with open availability
2.) Add confirmation/reminder emails to that template
3.) Manually email and confirm a time/date with your client
4.) Add the scheduler you created to a client’s project manually
5.) Open the scheduler on your computer and schedule on their behalf of the time/date you agreed upon.
More details on how to do that in this blog!
Why I schedule my Engagement Sessions Manually
One of the biggest drawbacks currently with the Dubsado scheduler is that it is not easy to update all the times to coincide with the sunset times. Although you can go in and set the scheduler times to be around sunset, I find it annoying to try to remember. Therefor, when I am scheduling an engagement session, I schedule the session on the client’s behalf via the scheduler for maximum automation. This means that we have a manual email or text conversation to establish the date and time, and then I schedule the client’s session via the scheduler inside their project.
How to Schedule on the Client's Behalf
Scheduling on the client’s behalf is very easy. First, you will want to create a scheduler with open availability (as the client won’t see it) and add a confirmation and reminder emails to that scheduler just as you would any other scheduler you would send to a client. Once you have this scheduler created, you will be able to use it on all of your clients!
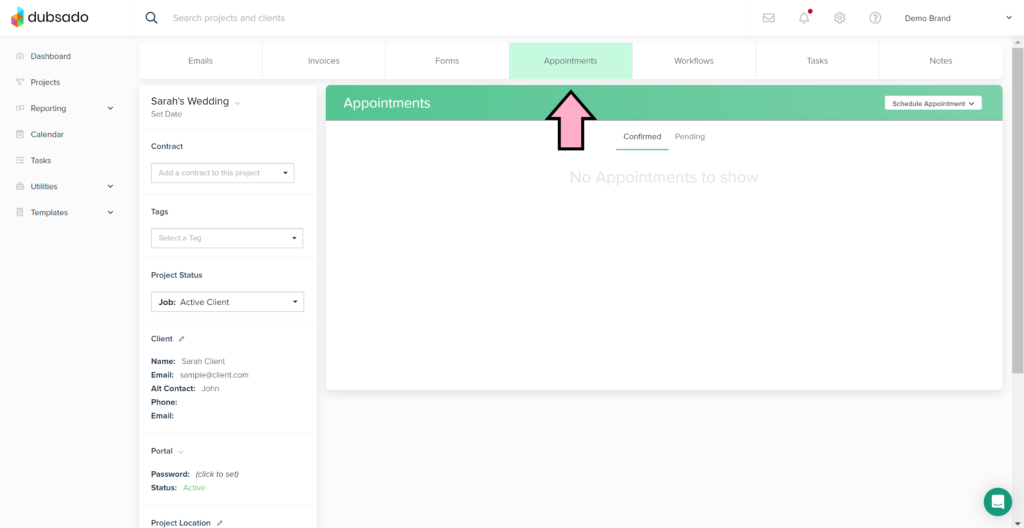
From here, navigate to your client’s project, and click on the “Appointments” tab.

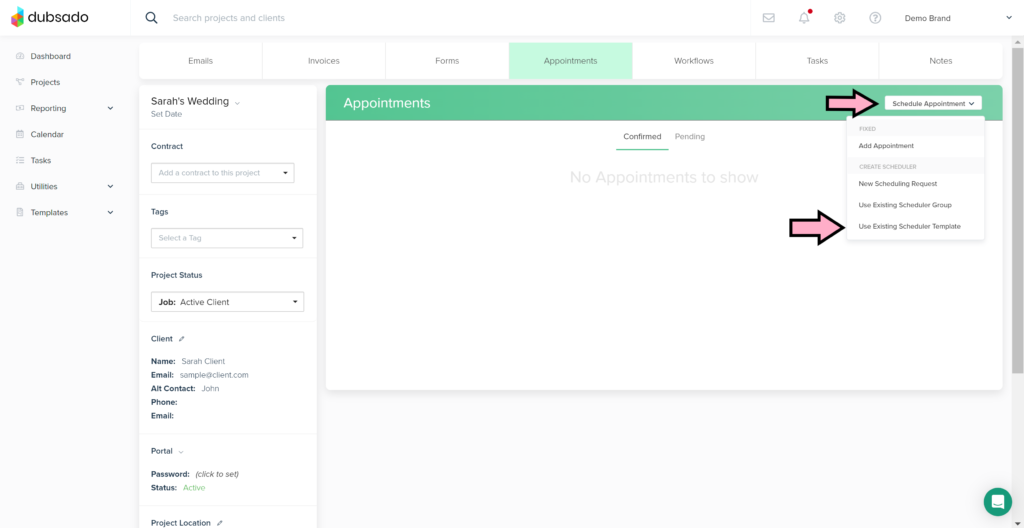
Next, click on the “Schedule Appointment” dropdown, and then click “Use Existing scheduler template” from the dropdown, click on the scheduler that you have created.

Once the scheduler has been added to the project, click on “Open” to open up the scheduler up. You will be able to select the time you agreed upon and easily submit in order to send your client an automatic confirmation along with the reminders you set up.

Grouping Your Engagement Sessions Together
This is a super easy way to keep everything in one place, but what if you would like to group all your engagement sessions into one status on your dashboard? In order to do this, you will need to create additional projects for each engagement session.
Here’s how:
1.) Create a public scheduler with reminders and confirmation emails attached.
2.) Add a new lead capture form with just first name, last name, and email.
3.) If you would like, create a short workflow to manage project statuses and to-dos and apply it in the lead capture form settings.
4.) Open the scheduler on your computer via the public link and schedule the meeting for the client by adding their name and email on the form part of the scheduler.
Tip For Different Locations
If you want to automate the location for your engagement session you can do this as well. If you have a few go to meeting spots, all you would need to do is duplicate the scheduler you created, change the location in the duplications, and then add the schedulers to a scheduler group. From there, simply add the scheduler group to the project (or open the public view) instead of using the individual scheduler. You will be able to easily click through and book the location for where you would like the client to meet you!
In Conclusion
Although we currently need to do a couple extra steps in order to schedule our engagement sessions, it is possible to facilitate them inside our Dubsado with some automation attached.
Want FREE Canned Email Templates?
In order to help you create this in your own Dubsado account easily, I’ve gone ahead and written out canned emails for each step of the process. Simply grab the freebie, copy the text and tweak to fit your brand. It’s that simple! Grab them below:

