fbpx

Photography Client Workflow Expert | Ann Losinski

How To Set Up Mini Sessions In Dubsado

Dubsado Mini Sessions

Here Are The Steps To Setting Up Mini Sessions in Dubsado:

1. Prep your account by adding “Mini Session” tags.
2. Create a lead capture form to gather critical client information.
3. Create a Mini Session Workflow with contract reminders
4. Create an Initial Booking Workflow
5. Attach the workflow to your lead capture form
6. Set up Reminder emails for your sessions in your canned email section
7. Create your scheduler for your mini session

This Tutorial Assumes that you already have the basics set up in Dubsado such as connecting your calendar and email to your account. If you haven’t already done this, please take a moment to sign up for Dubsado and complete the basic setup.

Click Here To Sign Up For Dubsado

A Word About Project Statuses:

I am a fan of keeping things simple, and not having more project statues than necessary. Therefore, I don’t believe that you need to have a separate project status in your pipeline for your mini-sessions, but you can, in most cases, use the statuses you already have. Instead, I use Dubsado Tags to categorize my sessions and see at a glance which of the sessions in my pipeline are my mini-sessions. I recommend having statuses to group all your inquiries, proposals sent, booked shoots before the session, and booked shoots after the session (Pre/Post gallery delivery) as statuses in your pipeline.

You can see an example of my project statuses below: 

Prep Your Account by Adding "Mini Session" Tags.

Next, you will want to add in a tag so that you can group all your mini sessions together. You will do this by clicking the “Customize” button on your projects page. 

You will then scroll all the way down on the page to the “Tags” section and click “Add Tag”. This will allow you to add in the tags you will need. Create two tags. One called “Mini Session” and one called “Mini Session | Not Booked”.  You can assign any color you would like to these tags. 

Create a Lead Capture Form to Gather Critical Client Information.

Next, you will need to create a lead capture form to connect to your scheduler. This form serves as the place to gather all the client’s information and create the project for each client scheduling a mini sessions.

On this form, collect all the information you need. You can certainly send a questionnaire later, but I find that you have a better return rate if you collect the information right away.

Pro Tip: I recommend adding a required field to the bottom of your form asking your potential clients to type “Yes” if they are ready to proceed with booking and pay their invoice.

Create a Dubsado Mini Session Workflow with Contract Reminders

The one downfall of using Dubsado’s scheduler for mini sessions or portrait sessions is that you are unable to have your client sign a contract during the actual booking process. They will need to have it sent to them via email and sign it at that point. 

To accomplish this, we will need to set up an email to send the contract automatically and reminder emails to go along with it. Don’t worry, in the next step, we will take into account the deposit and make sure this only gets sent if a client has actually paid the deposit and booked their slot. 

Create a workflow with the following:
– Send Contract Mini Session Contract immediately after workflow started
– Send Contract Mini Session Contract 2 days after all previous actions complete
– Send Contract Mini Session Contract 3 days after all previous actions complete
– Pause workflow 0.25 hour(s) after contract has been signed.

In this workflow, you also can add another “Start Workflow” action to start an additional workflow with more actions depending on your unique client process. Starting an additional workflow can allow you to move the client to additional statuses, send style guides, send welcome emails, etc. 

Although in some circumstances, you can use the hack of adding the contract as a sub-agreement and using form follow-ups, it will not work in this case as we are using workarounds for both the invoice being paid and the contract being signed. 

Create An Initial Booking Workflow

Next, we need to create another workflow that will allow us to ensure that the invoice has been paid. Paying the invoice in full will be what we will use to ensure that the client has officially booked their spot with us and is on our calendar. 

Create a second workflow with the following:

– Send email Mini Session –  Not Booked 8 hour(s) after workflow started. In this email, send a link to the public scheduler for the client to go back to and book again. You will want to grab this public scheduler link from the scheduler template page.
– Add tag Mini Session | Not Booked 1 Day After Workflow Started
– Archive Project 2 Days After Workflow Started. This will clean up your dashboard automatically if your client doesn’t book.
– Add tag Mini Session immediately after invoice paid in full
– Start Workflow Mini Session Contract immediately after invoice paid in full
– Pause workflow 0.25 hour(s) after invoice paid in full

Dubsado Mini Session Workflow
The Email “Mini Session Not Booked” will not send if the invoice is paid, due to the pause in the workflow after the invoice is paid.
 
The project will not archive if the invoice is paid, due to the pause in the workflow after the invoice is paid.
 
The workflow pause is to ensure that the above two things do not happen. If you need additional steps after the invoice has been paid, you can set up an additional workflow and use the “Start workflow” action after the invoice has been paid.

Attach the Workflow to Your Lead Capture Form

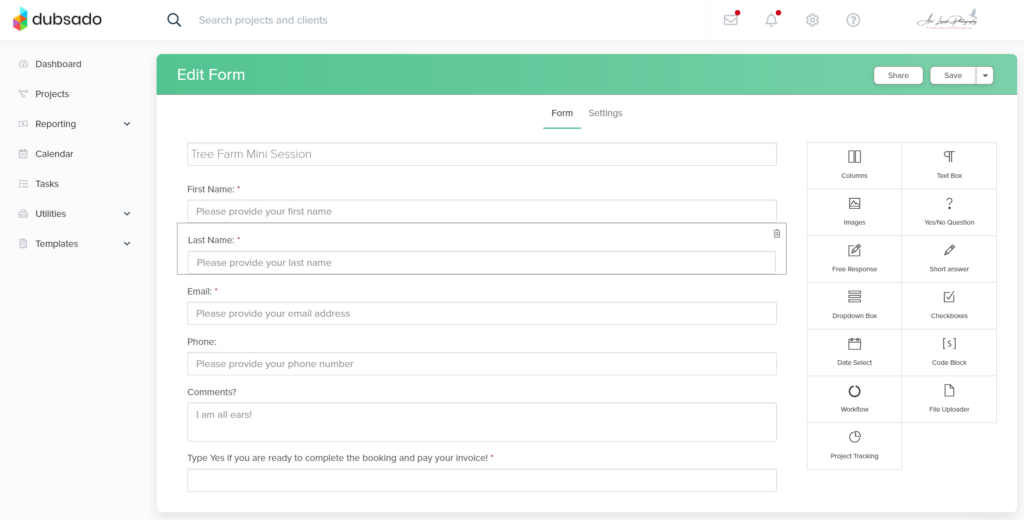
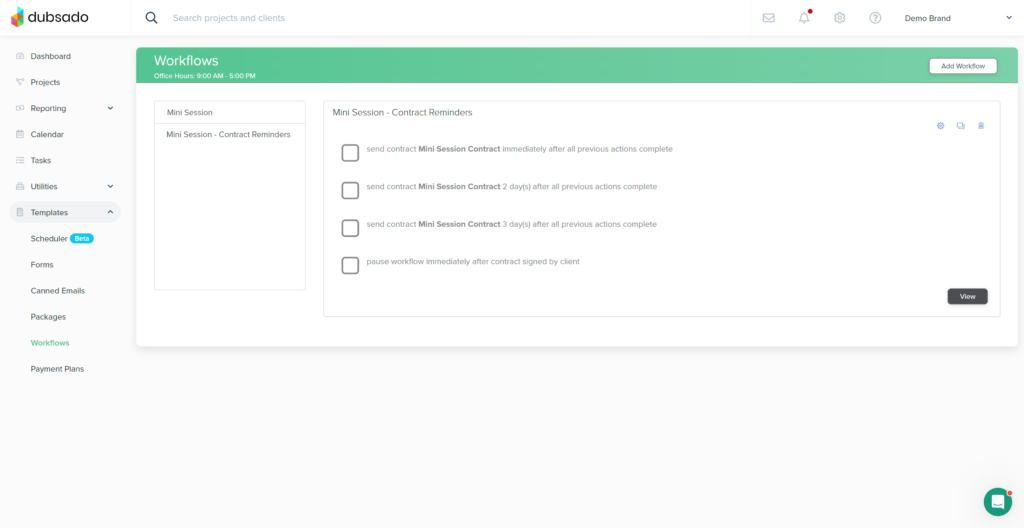
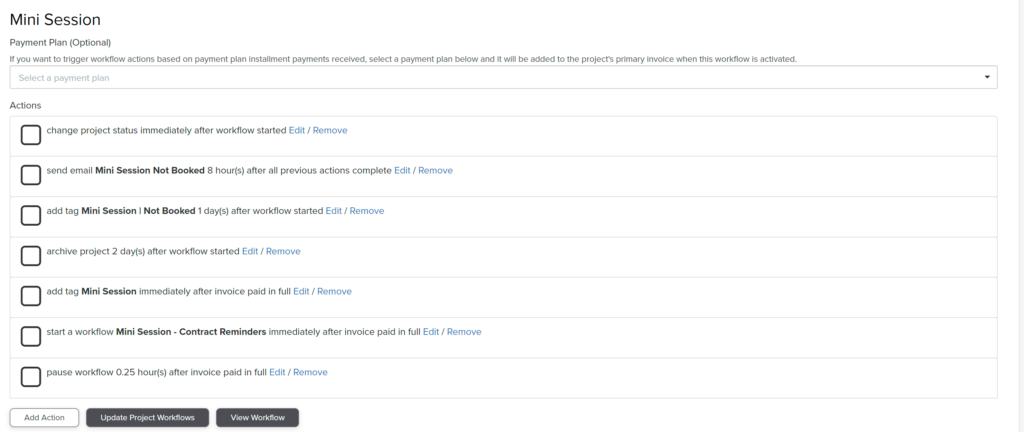
Now that we have both workflows set up, you will want to navigate back to the lead capture form that you created earlier. In the settings Area of Your Form, under Apply Workflow, choose the workflow you just Created. (The one with the reminder email.) Press the Save Button to save your form.

Untitled.png


Set up Reminder Emails for Your Sessions in Your Canned Email Section

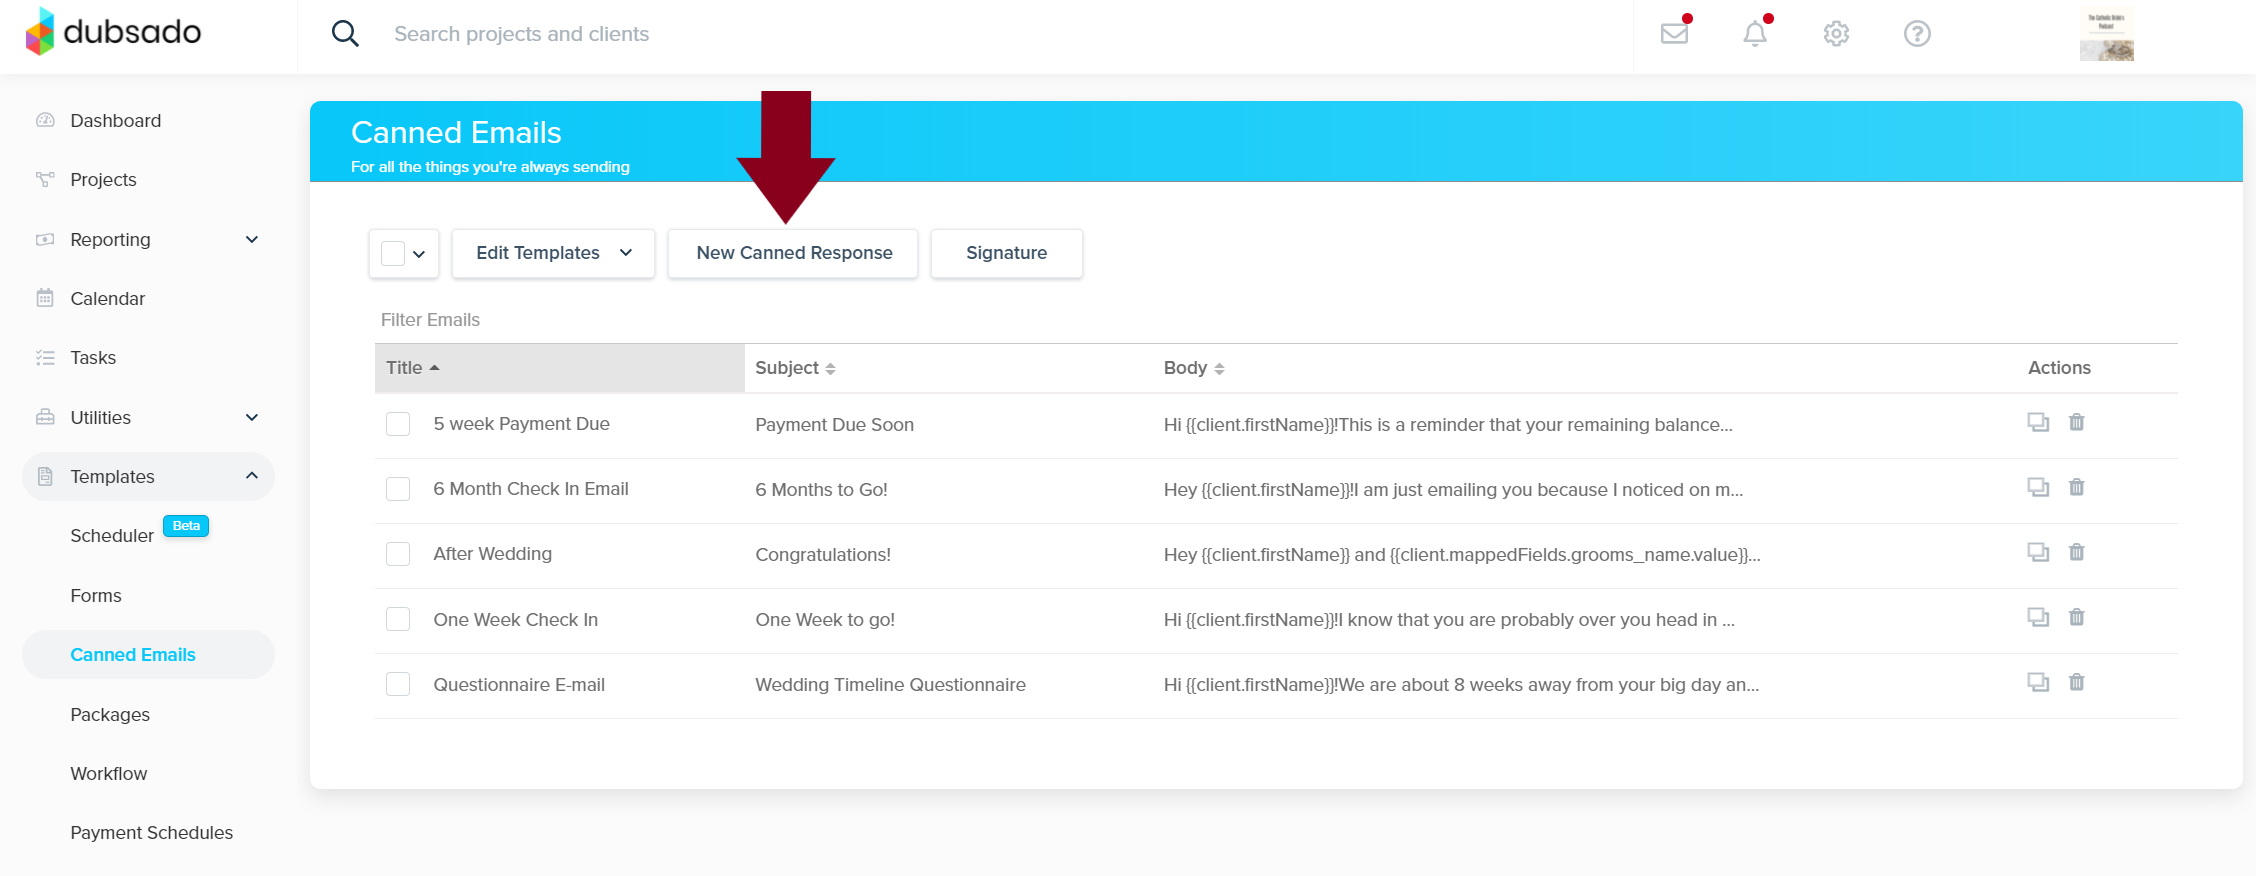
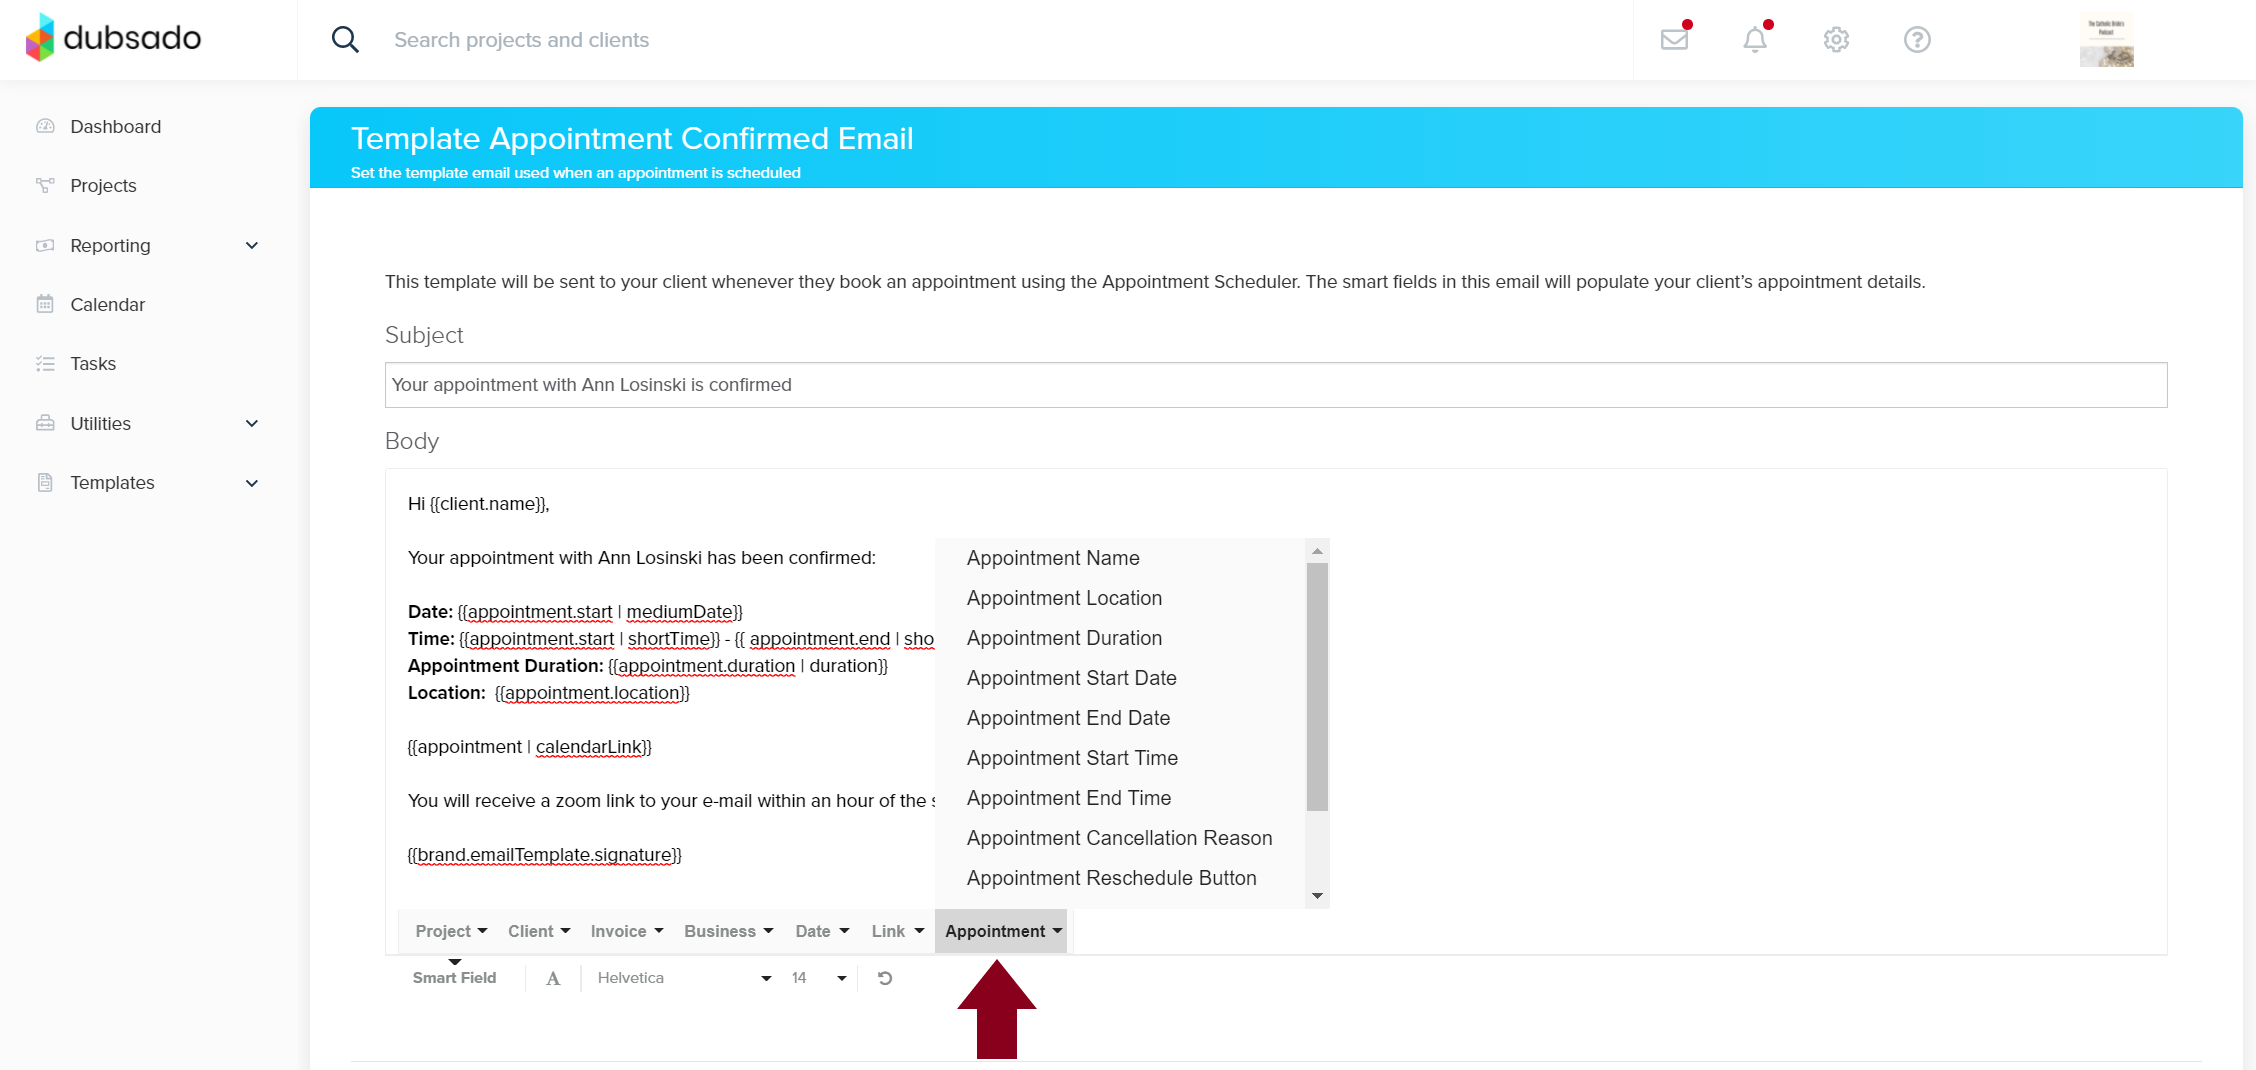
The first thing that we want to do before we even go to the scheduler page is write your emails. You will want to create three emails – a confirmation email, and two reminder emails.  You can include more information about the location, information on how to prepare, etc. Click on the “New Canned Response” button to generate a new email. You will set the time that they go out later, for now, just write the email. Remember you can use smart fields as above to populate in information like their scheduled time, etc!

Untitled.png


Create Your Scheduler for Your Mini Session

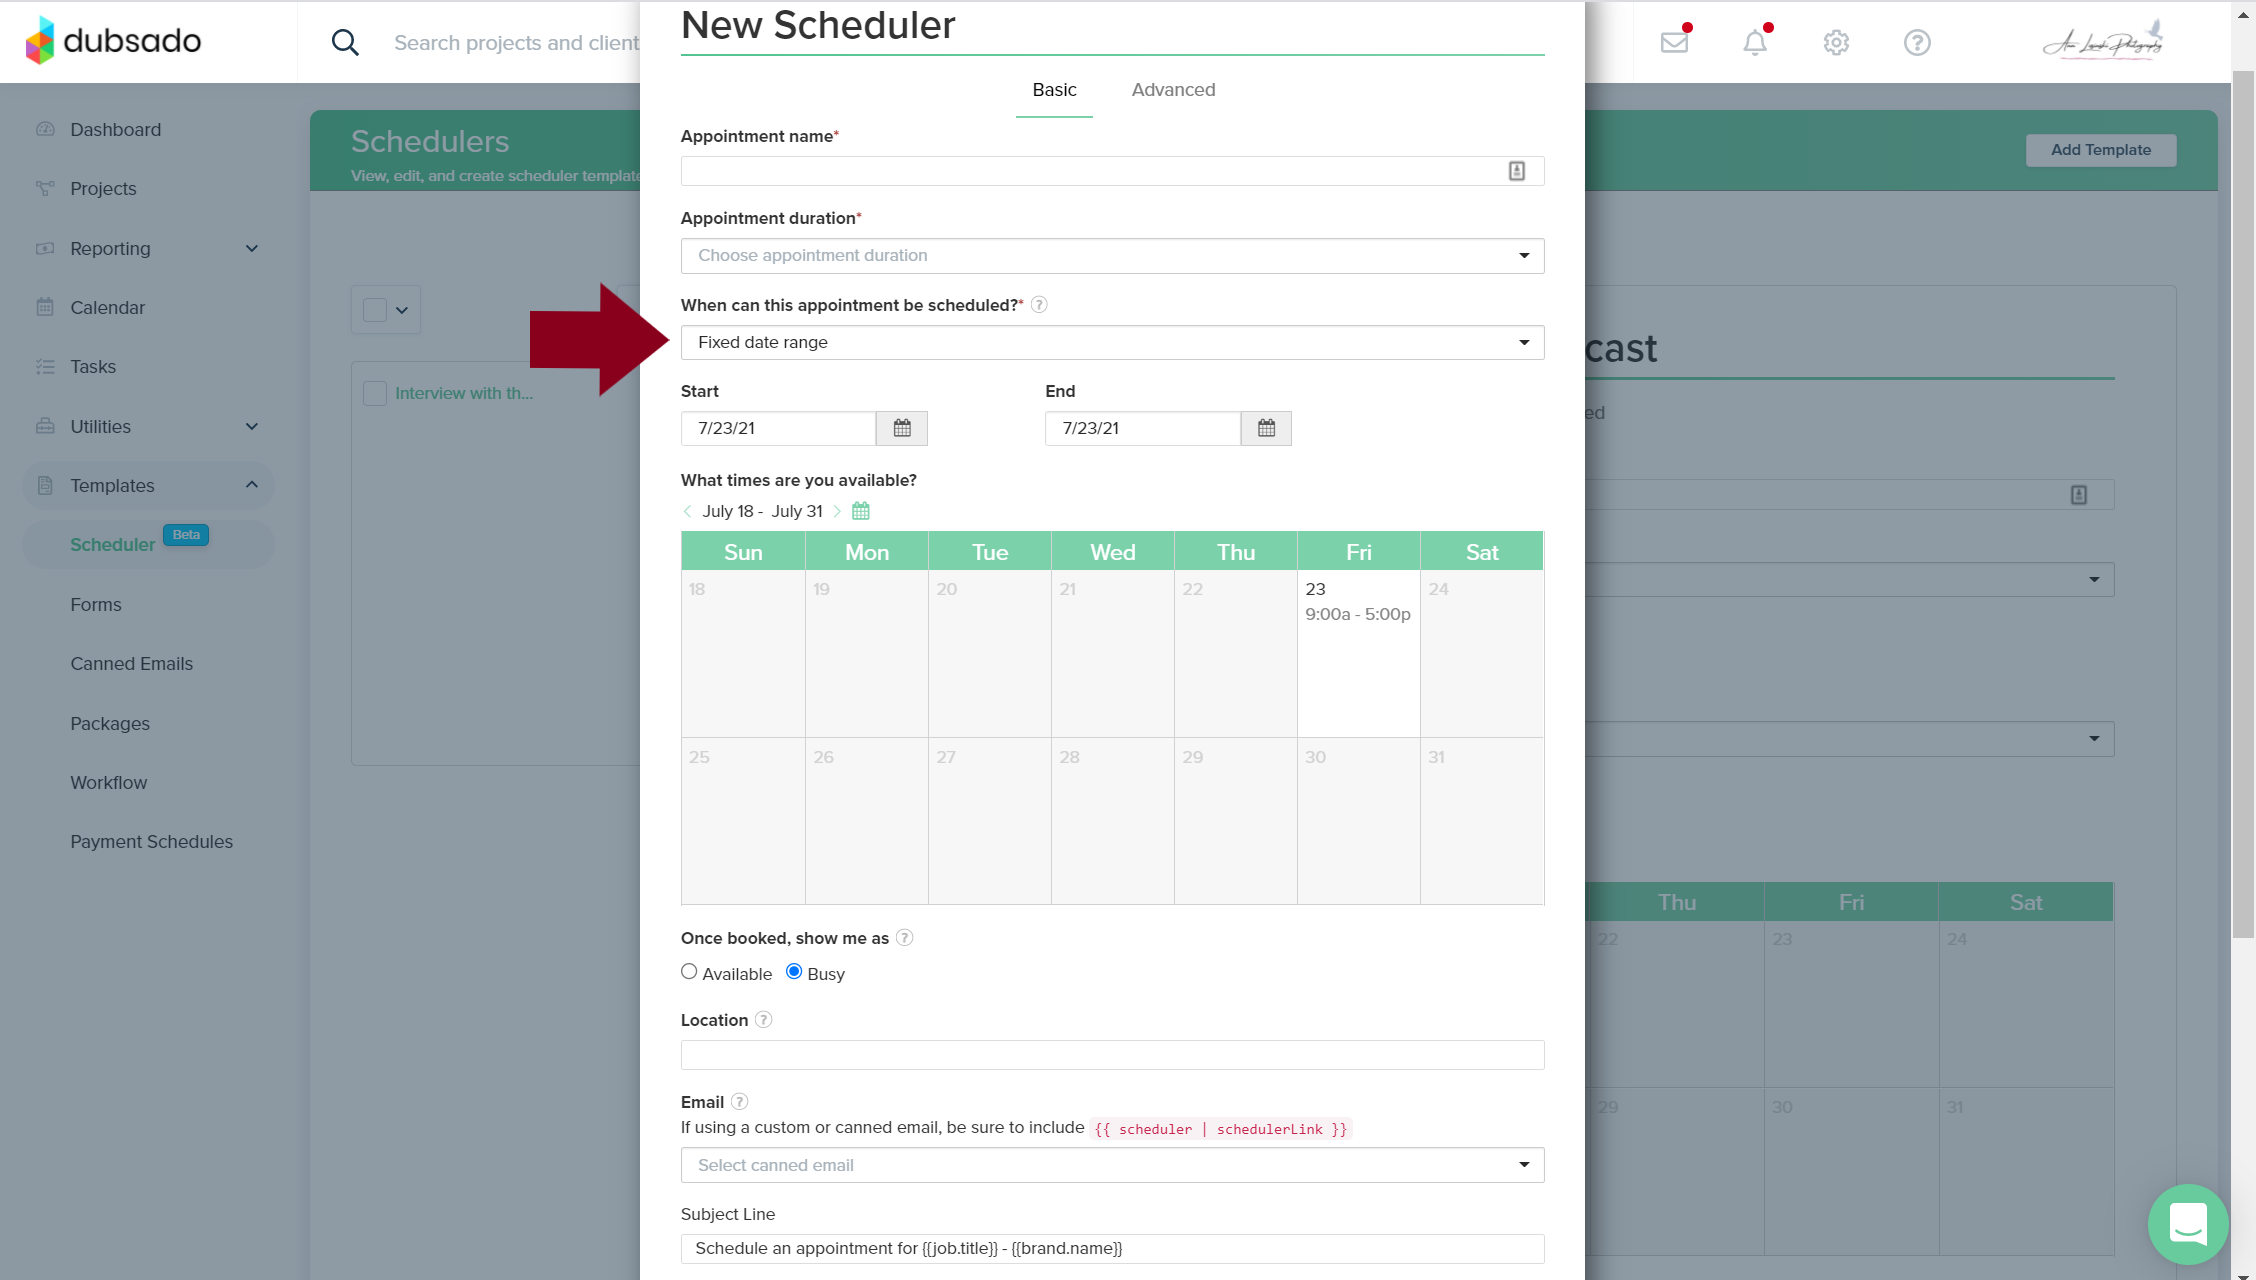
Navigate to the Scheduler Tab and create a new scheduler.

You will want to give it a name that will make sense to your clients so naming it something like “Ann Losinski Photography Fall Minis” would make sense.

Choose an appointment duration. For Minis, this is often like 20 minutes.

Set the “When Can This Appointment Be Scheduled” to say Fixed Date Range.

Set the dates and times when you will be available for You Mini Sessions.

Finally, Set the location to say where the Mini session will be held. This will show to your clients so make sure it is clear.

In the Advanced Settings, set the top settings how you would like them.

The top settings on this page are pretty self explanatory. They give you control over how many people can book, what the buffer time is in between sessions, and how far in advance people can book.

Also, if you wrote a custom confirmation email, select it from the dropdown, and under “Additional Form” locate and select the Lead Capture that you created earlier in step 2.

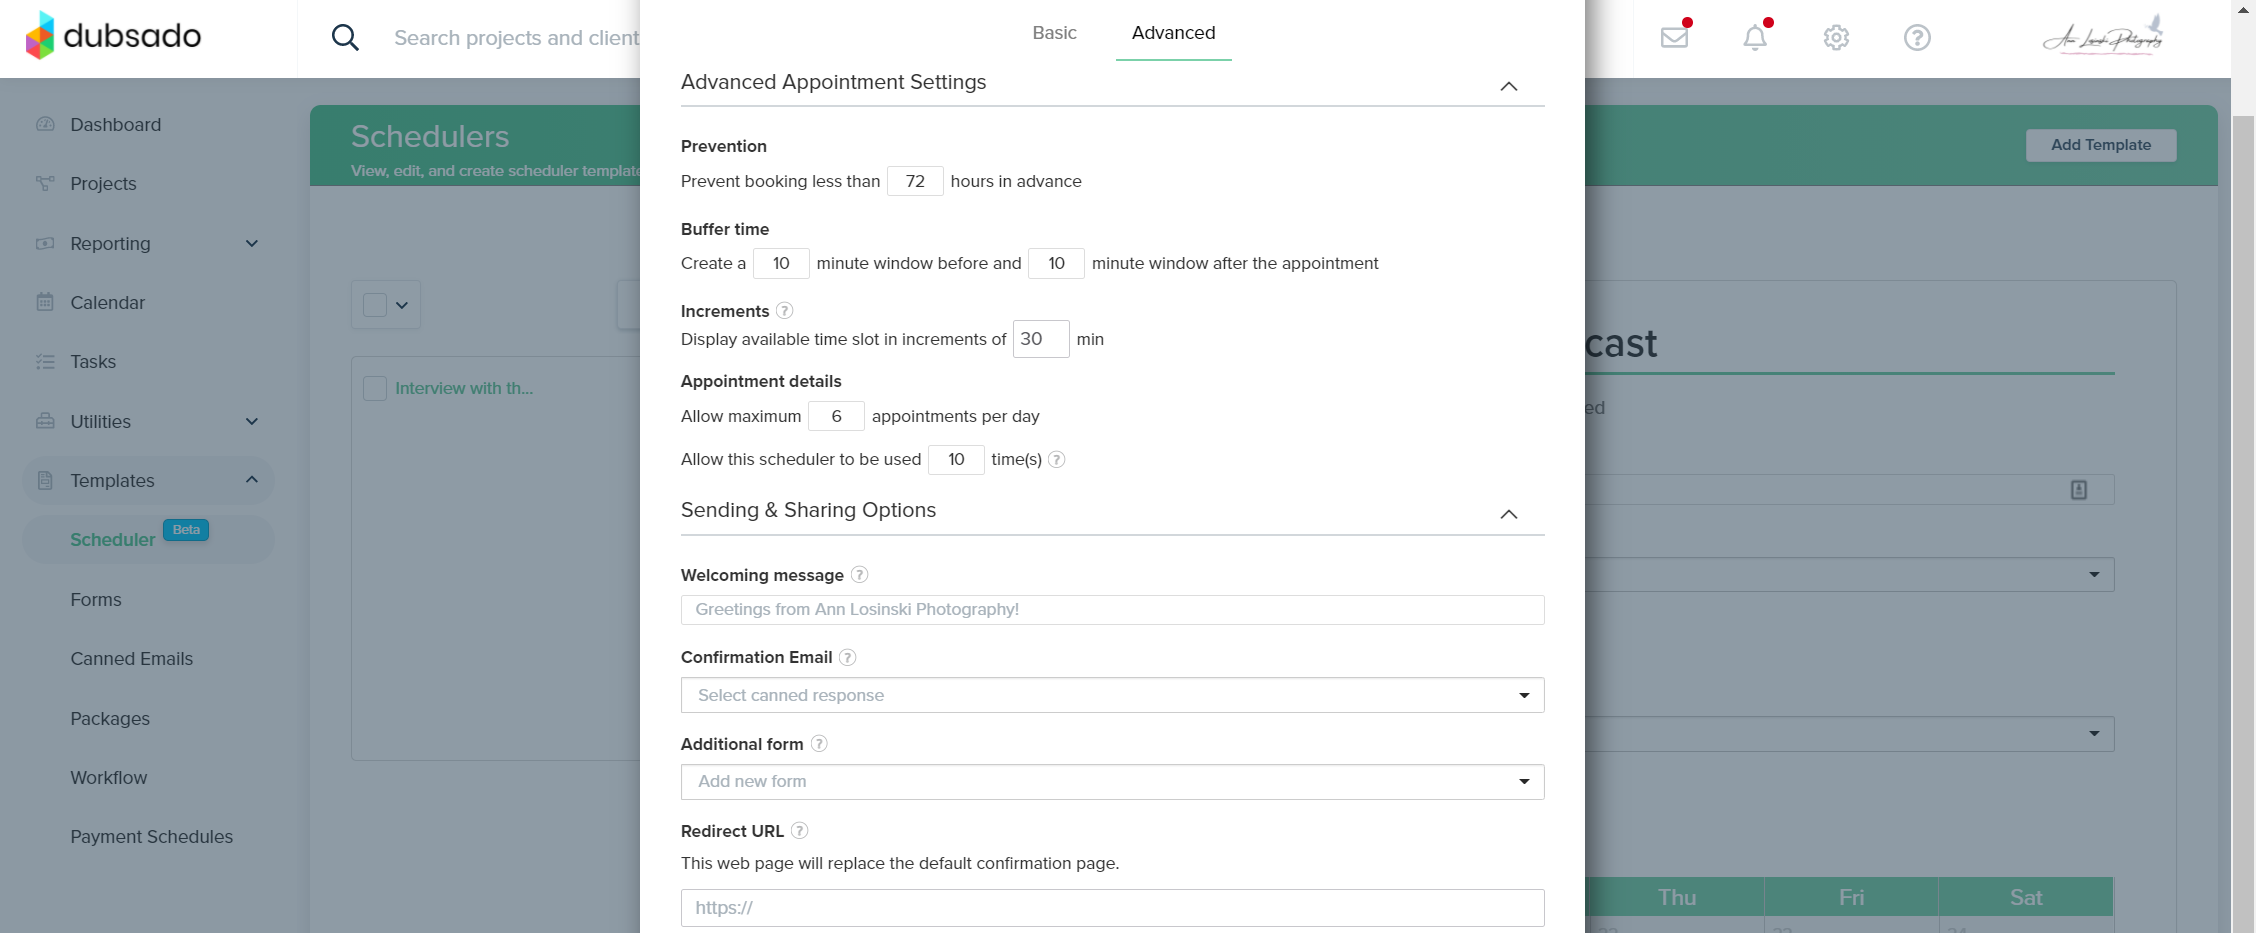
Under Additional form, make sure you select your lead capture form.

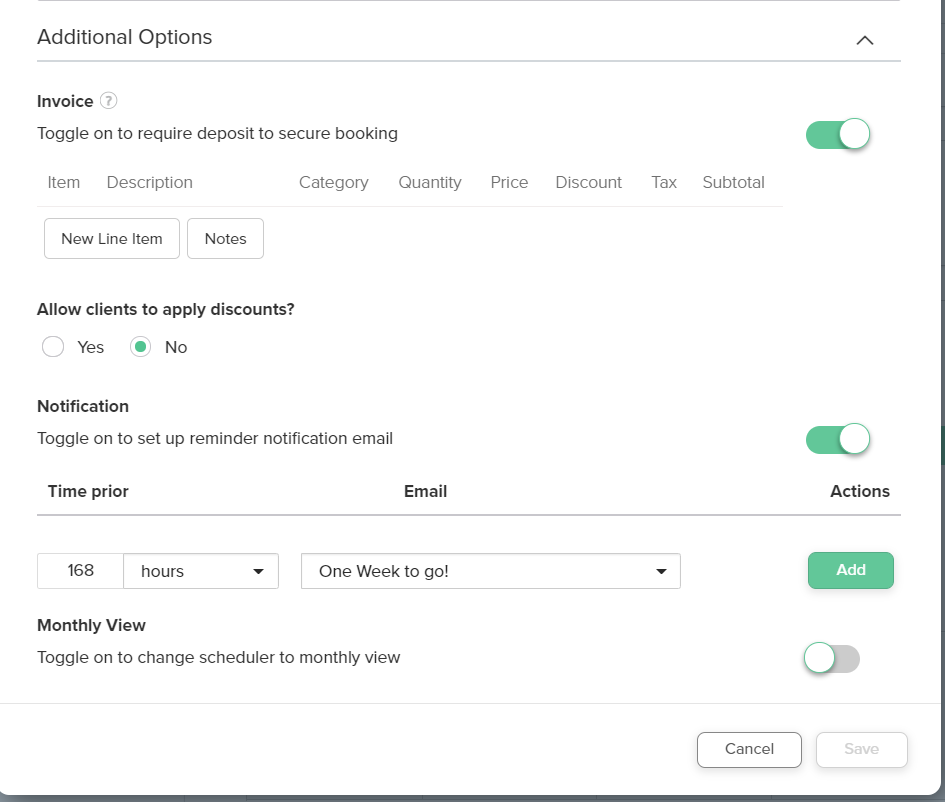
Under Additional Settings, Make sure that “Invoice” is toggled on. Add a new line item for the price of your Mini session.

Also toggle on the Notification setting to set up your reminder emails. Enter in the amount of time before the session that you would like to send the notifications and then select the emails from the drop down that you wrote out in step five.

Hit Save, and your scheduler is ready to go! You can now embed it on your website or send it directly to your clients.

To ensure that your scheduler is working properly, go ahead and sign up as yourself to make sure that it goes through. To test with the invoice, simply create yourself a discount code to bypass having to pay the invoice.

FAQ's About Dubsado Mini Sessions

In short, no. The scheduler requires the entire invoice to be paid upfront in order for the spot to be reserved. Because mini sessions are at a lower price point anyways, it is recommended to not attach a payment plan to them.

Yes! To offer multiple session lengths, duplicate your scheduler once you have it set up, adjust the session length, and then combine the two schedulers into a scheduler group.

Unfortunately, at this time, clients cannot sign a contract at the time of booking with the scheduler. It will need to be sent via an email once the slot has been booked.

Unfortunately, the scheduler cannot automatically assign the time your client selects as the project date. It will, however, block off that time on your calendar. This is why it is necessary to add in all reminder emails to the scheduler settings instead of inside a workflow. 

For setting up mini sessions in the way this blog is describing, no. 

If your entire day of your mini sessions is blocked off, you will want to check your connected calendar to ensure that there is no conflicting things on your calendar. (A big one here is if you added a “Mini Session” event on your calendar for all day and set it as “Busy”.) 

Do you have further questions about Mini Sessions? Looking for someone to set the process up for you? Feel free to reach out!

More To Explore:

Want to increase your client experience?